Wednesday, July 16, 2014

Anniversary Wreath

Not everything was the same as it was when I returned from Guatemala. For instance, my husband rearranged our entire living room. Another example - the extreme humidity from the laundry room next door caused the command hook supporting my button wreath to detach. Consequently, the great button wreath is in pieces in my closet.

My front door was barren and empty. And all the Pinteresting in the world did not help me come up with an idea for a festive summer wreath. Let's be honest - there are only three major holidays in the summer: my birthday, my grandfather's birthday, and my dad's birthday. But recently, I also celebrated my anniversary. With that in mind, I decided to tackle one of my biggest unsolved dilemmas - what to do with over 100 embroidery hoops from our reception?!

This wreath was created with two embroidery hoops from our wedding, some of the lace that filled them, one of the little birds used to decorate the sanctuary, and a couple of button flowers. First, I filled the larger, 12" hoop.


Then I placed the smaller 10" hoop on the 12" hoop in order to estimate where I should cut.


I made a simple "X" pattern in the lace with a pair of scissors based on my estimation.

I added the inner portion of the embroidery hoop on top of the lace, while the outer portion remained below. This is opposite of how you would normally load one.


After trimming the inside portion, I had an orange lace embroidery hoop wreath!

One of my favorite crafts for the wedding was creating button-nieres for the men in the wedding party. I had quite a few buttons left over from my button bouquet stash, so I used them to create a complementary boutonniere. Below, I tried to demonstrate the size of wire and button pairings. The wire is simply run through the button holes and twisted tightly behind them. After that, you can add wire leaves, beaded accessories, etc. I recommend making sure that you wrap all your additions to your "flower" in the same direction as the "stem" is twisted.


I attached my the bird (from Hobby Lobby, similar to these) and the flowers with a little bit of wire. The masterpiece is now hanging from an over-the-door wreath hook. No more accidents.


Sweet, simple, and bright for summer. Not to mention the romantic nostalgia...


I had all of these supplies on hand, so I can't give the cost break-down. I imagine that this could be accomplished easily for under $10 if you have none of the supplies on hand.

Saturday, July 5, 2014

Porcupine Quill Necklace

Finally back from Guatemala and crafting again!

This little project I've been planning for a long time, but never made the final steps to buy supplies and make it a reality.

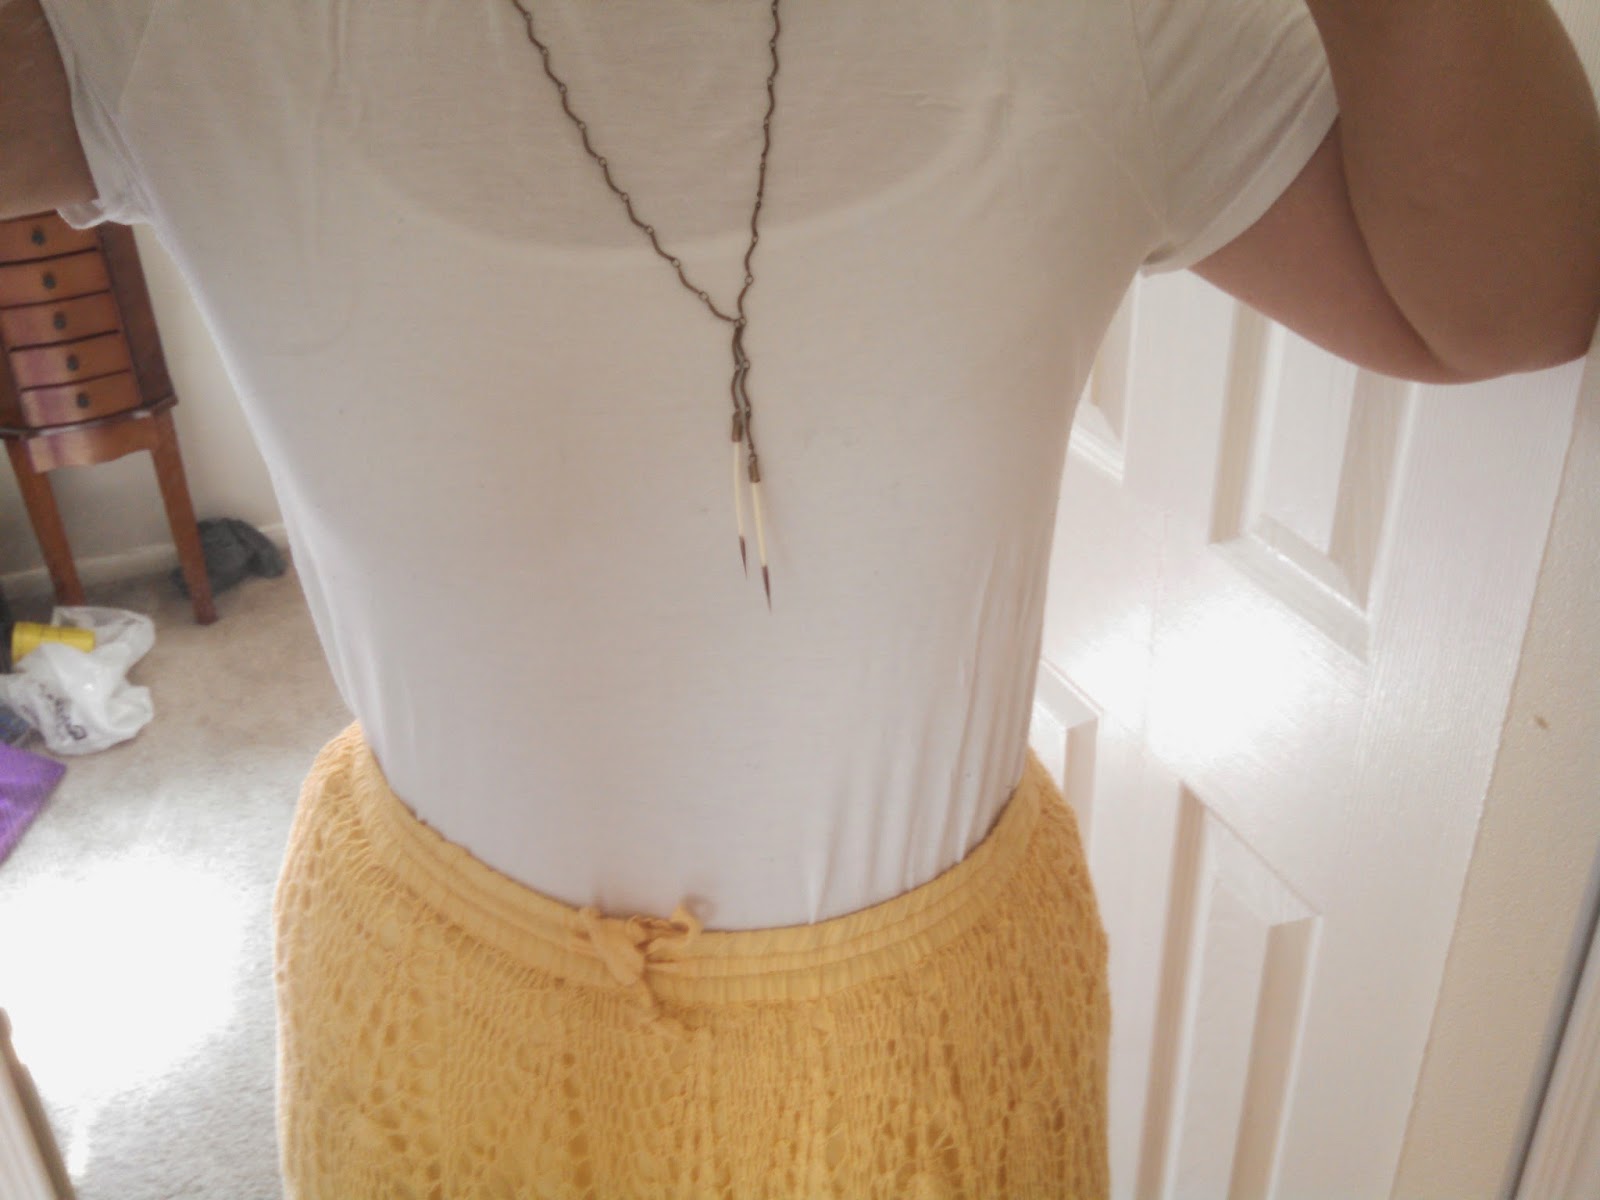
It's no secret that I love animals (duh) and I love wearing jewelry with animal flair. I have had a small collection of naturally-shed porcupine quills from a North American porcupine, Peggy Sue, for years. After clearing the project with the zoo director a couple years ago, this idea took a back seat to things like my wedding, vet school, and other small crafts. But the day has come! Here's my porcupine quill necklace:

The inspiration came from a simple necklace by K/LLER that paired a natural quill with a metal quill on a long chain. Easy enough to complete, but I put it off because I couldn't find the right metal quill for sale. Additionally, I couldn't find any tutorials on working with quills on Pinterest or by Googling.

First, let me give a small homage to Peggy Sue, the best porcupine this side of the Mississippi. She was a wonderful animal ambassador for the zoo, and when she finally passed, both zoo staff and the community mourned her. She was a favorite. Shortly before Peggy Sue left us, I collected some quills from her enclosure.

A few observations about porcupine quills:
1. Porcupines are a bit greasy, and the side of the quill that attaches to the body is often a bit rough and will need to be cleaned.
2. The opposite end has a barb that lessens the force required to penetrate skin while simultaneously making it very difficult to remove. You can read more about this feature here.
3. The quills are hollow.

I cleaned the quills and removed the barbs first. I used scissors to cut about 1/16 of an inch below the barb to ensure that I had cut off the small tapering that occurs just before the barb as well.

As far as other materials, I went to Von's and found a great chain and what I believe were labelled "tube closures." I chose a chain with a bit more detail than my inspiration piece by K/LLER.

I liked the uneven tails that were formed by crossing the chain, so I mimicked that detail by using the links of the chain itself to create the cross.

Then, I placed my trimmed quills in the tube closures and crimped them shut. I chose not to use new jump rings and instead used the small links from the chain. The jump rings I had on hand were so large that they ruined the delicate, streamlined effect of the chain and quills.

Voila! I regret putting this project off for so long. It was really easy and I love the result. Even though I couldn't find a metal quill, I really like the contrast of metal and natural porcupine. If I change my mind, I have some gold spray paint I could try to mimic the metallic quill of the K/LLER design.

The final cost/savings analysis:
- K/LLER original: $125
- Peggy Sue quills: free, but you can easily find cheap porcupine quills for sale
- Chain: $7.75
- Tube closures: $0.30
- Labor time: 30 minutes

Total: $8.05
TOTAL SAVINGS: $116.95

Friday, April 11, 2014

Cuddle Cup

New pets give me the perfect excuse to try things out. I'm still getting used to this whole guinea pig mama thing. He loves to snuggle, but he always wedges himself in a corner or under cushions. I found this great tutorial for something called a "cuddle cup."

This is actually my first time working with batting and it was sheer hell. I do not like it, Sam-I-Am!! But Hari loves his new cuddle cup, so I suppose all's well that ends well! Here's my attempt.

First, find a bowl in which your guinea pig will fit. The tutorial I linked suggests an 11" diameter circle, but that was far too small for an adult Texel. I wound up using an old chip bowl from Target.

Using that as a template, I cut two circles of fleece. Luckily, batting sticks to fleece like glue, so I slapped a square on one of the fleece circles and trimmed.


 Do not let your guinea pig or cat run off with the circles.


Then, I measured the circumference of the rim of the bowl. This measurement became the length of the wall of the cup. The wall has the same layers as the circular base (2 fleece, 1 batting). I used slightly higher walls for my slightly larger boy, so my wall pieces were 33.5" x 8". I used the chip bowl to create a shorter portion of the wall, so it is easier to climb into the cup.


Assembling the parts is a little bit tricky. First, pick one "wall" fleece and one "base" fleece. Fold the wall in half with the right side in. Sew the loose ends together to make a continuous loop.


Pin the base to the bottom of the wall, keeping right sides together. Be meticulous with this step, or else the pieces will not match well once you're sewing! Once the base is pinned, sew it on, creating the outer shell of the cup, like so:


Do not flip it inside out it! It needs to remain inverted when you assemble the inner and outer shells. That will happen at the very end! If you're wanting to play on the safe side, tack your batting to your remaining fleece pieces. Then, repeat the process used to form the outer shell of the cup, but keep the batting on the wrong side. I found sewing all that material to be very slow going, but this was my first time working with so many layers!
The fun part: Stack the inner shell inside of the inverted outer shell. I pinned the wall at the middle of the lowest portion, and on either side of the low portion, where it swoops back up to meet the height of the rest of the wall. After pinning, it slumped over on itself. Since this is supposed to stand on its own, I went ahead and trimmed about 1.5" off the top, making my wall height closer to 6.5". Sew around the top of the cup, leaving a gap somewhere to pull the right side of the outer shell out. This will effectively "revert" the inverted cup. Almost done!
For the gap that's left over, just do a quick blind stitch. Take some time to align the seams and form the cup into its final upright state. If you have cats, do not let them see the final result, because they will become jealous and attempt to steal it.
Introduce your guinea pig and enjoy! Hari loves his. He even figured out how to flip it over and make a cave. He's a happy piggy.


Monday, April 7, 2014

New Arrival, New Craft!

This Sunday, our little family gained a new small-and-fuzzy member from a local exotics rescue.

His name is Harington, and he's a Texel Cavy... or just a fancy-ass guinea pig, colloquially. He's the sweetest thing, naturally, but his curly textured fur is rather long, so I didn't want to use a standard shavings cage substrate. He gets tangled up in hay enough as it is!

While I was looking for alternatives, I stumbled across this tutorial and decided to go for it! The idea is to use fleece as a "wicking" material to an ultra-absorbent and waterproof material. This absorbs the urine, and the feces can easily be swept up daily, making for a cleaner cage, less expense, and a happier, healthier gpig.

I grabbed some generic waterproof mattress pad protectors from Wal*Mart. In case you're wondering dimensions and materials:


Using the bottom of my cage as a template, I made a pattern out of cardboard and cut the mattress pads down to size (28" x 16"). The dimensions I used were of the bottom inside the plastic tub. After that, I lay it down on no-pill fleece and cut a small border around the mattress pad. I sewed around the edge of the mattress pad (zig-zag stitch).


I measured more fleece for the side panels. Mine were 29" x 11" and 17" x 11". I used half-inch margins just to make it easy on myself. 11" is twice the height of the side the plastic base of the cage, that way the sides roll over and look pretty on the outside, too. It also helps prevent Harington from pulling the fleece into the cage and making a mess everywhere.


The next step is to connect the side pieces together into a large loop. Keep all the seams to the same "side" of the circle. Before moving on, make sure your side pieces fit the base. You'll end up with something like this:


The hardest part is last, of course! The bottom waterproof/fleece piece must be attached to the side panels. I used a straight stitch with very small margins to prevent loss of interior space. The corners were very difficult - make sure that they are stitched over very tightly!


I threw down a couple of generic animal pee-pads before laying down the cage liner.


Add your lid and accessories. The fleece moved quite easily for the notches where the lid attaches. The side clasps are secure. No extra holes in the fleece are necessary, and this is pretty thick fleece.
Add the guinea pig...


And let the good times roll!

Just to give a little review of why fleece bottoms are GREAT:
- The absorbent layers and daily sweeps keep the cage clean for about a week, making for a healthy environment.
- No worries that the guinea pig will get shavings stuck in their fur.
- I looks neater than shavings, but is still just as cozy.
- If I get tired of the design I created, I can just redo this process with a new pattern of fleece. Maybe for holidays?
- MONEY. You'll save more making a couple of these and rotating/laundering them once a week than buying litter and cleaning supplies over the lifespan of the gpig.
- TIME. I have a small zoo now, with the addition of Harington. Finals are swiftly approaching. Cleaning daily takes all of 1 minute, and I can throw this in the wash with my stuff once a week.


I still need to make one more so I can rotate the two weekly, but this project was a bit time-consuming for a week with an exam.


Wednesday, March 19, 2014

Bedroom update

Long time, no see!
Vet school and illness got the better of me, I'm afraid. The hubster and I were both sick at the same time, too. I'm not sure who was taking care of whom, but I'm pretty sure the cats were looking after both of us for a time. We were miserable.

Over that now, and onto the rearrangement of the bedroom. The before shot was taken several months ago, shortly after we moved into our apartment. The bedroom has been very utilitarian until now - just a bed, hamper, and two closets. Our large dresser (which is really 3 separate pieces) was in another room. Here's the before:


I've added some more decor since then, but the bedroom was still very plain. Also, we wanted to have all our clothes in the same room. After some careful measurements, we rotated the bed and moved our dresser into the room. Here's the after (the room did not lengthen, it's just the panoramic view):


I am so happy with the change! There's plenty of room for the drawers to open, and the cats are no longer using our pillows as a launching point to get to the window. It took about thirty minutes to do this, but the results are fantastic. Just need to adjust the artwork to fit the new white space. You can also see that the cats are enjoying access to both of the bedroom windows now.

And speaking of that beastly dresser, I have a confession to make: I am a slob with the style of a trucker. I have too many t-shirts and not enough patience to make them all fit into the drawers. Shortly before we moved the dresser, I got my act together and tried folding my shirts so they stand on end (like so). The results were dramatic:


That's right - I gained space! My only sage wisdom with this is to check the height of your drawers. Some of the larger unisex tees are just a little bit high. I can still slide the drawer in and out of the frame with ease, but if the shirts were any larger, I might have to add an additional fold or find another way to stack them.

And as a last booyah! to the bedroom makeover:


I pulled my wedding button bouquet out of storage and have it displayed, finally! [Yes, that IS an adorable picture of my sister and me waaaaaay back when.]


That's it! Hopefully spring break will help my domestic productivity kick start. I need more crafting in my life.


Tuesday, February 4, 2014

Quick and easy breakfast mini quiche

I have a confession: I am a lazy person before the hour of 10 a.m. Naturally, my 7:30 a.m. class time is at war with my preferred sleeping habits. My bed and I have a love-hate relationship; I love my bed and hate to leave it.

This usually leads to me racing around the apartment trying to shovel breakfast down while getting dressed and grabbing my materials for the day. To avoid having to actually prepare a breakfast daily, I make mini quiche in advance.

When I first made these, I had NO idea what a quiche was. However, after a little Pinteresting, I discovered that this idea was not original and had a name. With no further ado, I give you the breakfast mini quiche!

Gather your supplies! I eat two of these every morning, so I usually make an even dozen. This means I use about 12 ounces of breakfast turkey sausage, a dozen eggs, and a sprinkling each of green onion and cheddar cheese:


Really, you could add just about anything you want to these! I've been meaning to experiment with just egg whites, feta, basil, and roma tomato... but bacon would be an easy substitution! Next, brown your meat and whip those eggs! I recommend really breaking up the sausage into small chunks - the larger pieces make the next step difficult. In case you wanted to know what a dozen eggs looks like when beaten, it's about 2.5 cups:


I use a non-stick cupcake pan with a little veggie oil spray to bake these. Using a spoon, I put in just enough sausage to cover the bottom of each cup.


Next, I pour in the egg! I suppose that I could add the green onion and cheese first, but I prefer to have those at the top just for appearance. Luckily, with this cupcake pan, I have never had to allot a certain amount of beaten egg per cup; it always magically works out in the end.


Top 'em off with the green onion (which I grow on my kitchen counter in a large test tube) and cheddar cheese:


And here is where cooking fails to be a science. I bake these for 20 minutes at 350°F. If you like your eggs well done, go for 25 minutes... but when these are reheated in the microwave, they tend to take on a spongy texture. The sponginess occurs before they're fully warmed when I bake these for 25 minutes. To avoid eating cold, spongy eggs, I opt for the shorter baking time and microwave for 25-30 seconds. Here is the final product:


You can see that they have risen quite a bit in the oven. I was quite surprised with how fluffy they are, despite being baked.


Depending on your preference, you can leave them in the pan to cool or remove them from the pan before cooling. I usually remove them as soon as they leave the oven. With a rubber spatula, they pop out of the pan with no resistance whatsoever. Too cool.


See? A delicious army of on-the-go breakfasts. Once these bad boys are cool enough, I will bag them in pairs and put them in the fridge for the week. Even if I roll out of bed especially late, I can always pop these in the microwave and take them to go!

Alright! Back to studying!

Remember - breakfast is the most important meal of the day.